How To Use Child Theme Configurator
Before You Begin
Please review the Caveats section.
Installation and Setup
- To install from the Plugins Admin:
- In the WordPress Admin, go to “Plugins > Add New.”
- Type “child theme” in the “Search” box and click “Search Plugins.”
- Locate “Child Theme Configurator” in the list and click “Install Now.”
- To install manually:
- Download the Child Theme Configurator plugin archive.
- In the WordPress Admin, go to “Plugins > Add New.”
- Click the “Upload” link at the top of the page.
- Browse your computer for the Child Theme Configurator zip archive and click “Install.”
- In the WordPress Admin, go to “Plugins > Installed Plugins.” Locate “Child Theme Configurator” in the list and click “Activate” (“Network Activate” first for multisite).
- Navigate to “Tools > Child Themes” (multisite users can also go to “Network Admin > Themes > Child Themes”).
Start Here: Parent/Child Tab
- Select an action:
- CREATE a new Child Theme – Install a new customizable child theme using an installed theme as a parent.
- CONFIGURE an existing Child Theme – Set up a previously installed child theme for use with the Configurator or to modify current settings.
- DUPLICATE an existing Child Theme – Make a complete copy of an existing Child Theme in a new directory, including any menus, widgets and other Customizer settings. The option to copy the Parent Theme settings (step 8, below) is disabled with this action.
- RESET an existing Child Theme (this will destroy any work you have done in the Configurator) – Revert the Child theme stylesheet and functions files to their state before the initial configuration or last reset.
- Select a Parent Theme if creating a new Child Theme; select a Child Theme if configuring, duplicating or resetting.
- Analyze Child Theme – Click “Analyze” to determine stylesheet dependencies and other potential issues.
- Name the new theme directory if creating a new Child Theme; otherwise verify it the directory is correct. – This is NOT the name of the Child Theme. You can customize the name, description, etc. in step 7, below.
- Select where to save new styles:
- Primary Stylesheet (style.css) – Save new custom styles directly to the Child Theme primary stylesheet, replacing the existing values. The primary stylesheet will load in the order set by the theme.
- Separate Stylesheet – Save new custom styles to a separate stylesheet and use any existing child theme styles as a baseline. Select this option if you want to preserve the original child theme styles instead of overwriting them. This option also allows you to customize stylesheets that load after the primary stylesheet.
- Select Parent Theme stylesheet handling:
- Use the WordPress style queue. – Let the Configurator determine the appropriate actions and dependencies and update the functions file automatically.
- Use @import in the child theme stylesheet. – Only use this option if the parent stylesheet cannot be loaded using the WordPress style queue. Using @import is not recommended.
- Do not add any parent stylesheet handling. – Select this option if this theme already handles the parent theme stylesheet or if the parent theme’s style.css file is not used for its appearance.
- Customize the Child Theme Name, Description, Author, Version, etc.
- Copy Parent Theme Menus, Widgets and other Customizer Settings to Child Theme. – NOTE: This will overwrite any child theme options you may have already set.
- Click the button to run the Configurator.
- IMPORTANT: Always test your child theme with Live Preview (theme customizer) before activating!
Premium and Custom Built Child Themes
Working with an existing child theme presents a number of potential challenges.
First, if the child theme was purchased from a theme vendor that subsequently publishes updates, there is no way to protect it from being overwritten when the update is installed. This effectively defeats one of the main reasons to use a child theme in the first place.
Second, modifications will be applied directly to the original child theme stylesheet, creating the risk of permanently changing the author’s design.
Both of these scenarios can be managed by creating a duplicate of the existing child theme and using Child Theme Configurator to apply changes to the new version.
Install The Child Theme
- Go to Appearance > Themes.
- Click “Add New” at the top.
- Click “Upload Theme” at the top.
- Click “Browse” to select your zip file. Click “Install Now” but DO NOT ACTIVATE.
Duplicating Existing Child Themes
 Child Theme Configurator gives you the option to duplicate an existing child theme when you “Generate/Rebuild Child Theme Files” from the Parent/Child Tab. It is only visible when you open the “Additional Fields” toggle next to the “Child Theme” option.
To duplicate the child theme, check the box and enter a “slug” for the new version. Child Theme Configurator will copy all child theme files and apply any settings you enter to new version.
Any theme updates will be applied to the original version so you may need to manually synch the two themes from time to time.
Copy Theme Options – Don’t Lose Your Hard Work!
If you have already set up widgets, menus and other custom settings, Child Theme Configurator lets you copy them to the new child theme.
Simply check “Copy Parent Theme Menus, Widgets and other Customizer Options” when you create child theme files on the Parent/Child tab. If you want to set different options you can either apply them after you activate the child theme, or by using the “Live Preview” under Appearance > Themes.
Normally, when you create child themes, WordPress generates fresh new set of theme options, including Nav Menus and other customizations like Custom header, Background and font colors, and you would have to set them up all over again.
Be aware that some options are specific to each theme, and some are specific to the parent theme only (meaning the child theme CANNOT override them). You will have to find out from the theme author which are which. See Working With Multisite WordPress for additional details about network site options.
How to Use the CSS Editors to Customize Styles
There are several ways to identify and override parent styles. The Child Theme Configurator lets you search styles by selector and by property. If you wish to change a specific selector (e.g., h1), use the “Query/Selector” tab. If you have a specific value you wish to change site-wide (e.g., the color of the type), use the “Property/Value” tab.
Query/Selector CSS Editor Tab
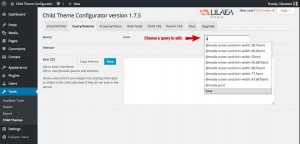
The Query/Selector CSS Editor tab lets you find specific selectors and edit them. First, select the media query group that contains the selector you wish to edit by typing in the Query autoselect box. Select by clicking with the mouse or by pressing the “Enter” or “Tab” keys. The base media query group is selected by default.
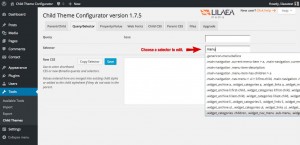
Next, find the selector by typing in the Selector autoselect box. Select by clicking with the mouse or by pressing the “Enter” or “Tab” keys.
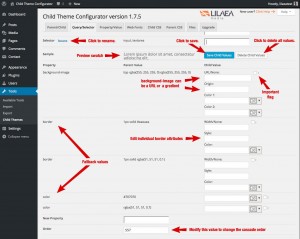
This will load all of the properties for that selector with the Parent values on the left and the Child theme values inputs on the right. Any existing child values will be automatically populated.
There is also a Sample preview that displays the combination of Parent and Child overrides. Note that the border and background-image get special treatment.
You can force style overrides (so called “!important” flag) by checking the “!” box next to each input. Please use judiciously.
If you need to rename the selector, click “rename” and an input will appear to edit it. Note: This option is intended for new custom selectors that have no parent theme equivalent. It only renames the child theme version of the selector. If you are editing an override of an existing parent theme selector, the child selector will no longer match and will not correctly override the parent selector.
The “Order” field contains the original sequence of the selector in the parent theme stylesheet. You can change the selector cascade order by entering a lower or higher number in the “Order” field.
Click “Save” to update the child stylesheet and save your changes to the WordPress admin.
Add New Properties
If you wish to add additional properties to a given selector, first load the selector using the Query/Selector tab. Then find the property you wish to override by typing in the New Property autoselect box. Select by clicking with the mouse or by pressing the “Enter” or “Tab” keys. This will add a new input row to the selector inputs. Properties are written to the stylesheet in alphabetial order.
Add Fallback Values
Child Theme Configurator allows you to save multiple values for the same property. This enables “fallback” behavior for older browsers. Use the “New Property” menu to select an existing property and a new input row will be added to the page. Multiple property values are written to the stylesheet in the order they are added to the selector. To reorder, swap the values.
Raw CSS Editor
If you wish to add completely new selectors, or even new @media queries, you can enter free-form CSS in the “Raw CSS” textarea. Be aware that your syntax must be correct (i.e., balanced curly braces, etc.) for the parser to load the new styles. You will know it is invalid because a red “X” will appear next to the save button.
If you prefer to use shorthand syntax for properties and values instead of the inputs provided by the Child Theme Configurator, you can enter them here as well. The parser will convert your input into normalized CSS code automatically.
Property/Value CSS Editor Tab
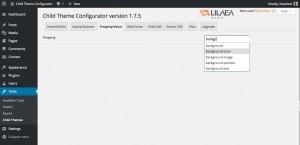
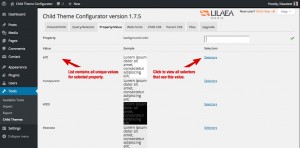
The Property/Value CSS Editor tab lets you find specific values for a given property and then edit that value for individual selectors that use that property/value combination. First, find the property you wish to override by typing in the Property autoselect box. Select by clicking with the mouse or by pressing the “Enter” or “Tab” keys.
This will load all of the unique values that exist for that property in the parent stylesheet with a Sample preview for that value. If there are values that exist in the child stylesheet that do not exist in the parent stylesheet, they will be displayed as well.
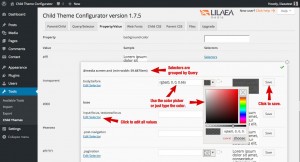
For each unique value, click the “Selectors” link to view a list of selectors that use that property/value combination, grouped by query with a Sample preview of the value and inputs for the child value. Any existing child values will be automatically populated.
Click “Save” to update the child stylesheet and save your changes to the WordPress admin.
If you want to edit all of the properties for the selector you can click the “Edit Selector” link and the selector will automatically load in the Query/Selector Tab.
Spectrum Color Picker
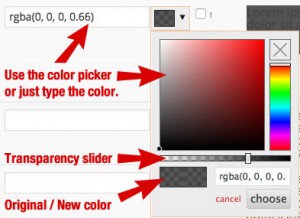
Child Theme Configurator now uses Spectrum for color inputs. In addition to showing a preview swatch, Spectrum allows you to use red-green-blue-alpha ( RGBA ) colors with transparency. Drag the bar below the color selector to adjust the transparency. Spectrum also supports named colors as well as hue-saturation-luminosity ( HSL and HSLA ) syntax. The new color syntax is applied to the style automatically.
Using Web Fonts
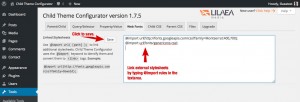
You can link additional stylesheets and web fonts by typing @import rules into the textarea on the Web Fonts tab.
Note: Child Theme Configurator no longer writes @import rules to the stylesheet. Instead, it uses the @import keyword to identify and enqueue them in the script queue. WordPress then converts them to <link> tags in the rendered HTML.
Example:
@import url(http://fonts.googleapis.com/css?family=Oswald);
Important: do not import the parent theme stylesheet here. Use the "Parent stylesheet handling" option from the Parent/Child tab.
If you selected any stylesheets under “Parse additional stylesheets” when you created your child theme, those styles will be available to create overrides in the Child Theme stylesheet.
WordPress will automatically load the additional stylesheets when it loads the parent theme, so you do not need to add @import rules for them here.
The example shown loads a local custom stylesheet as well as font stylesheets from Google Web Fonts.
Files Tab
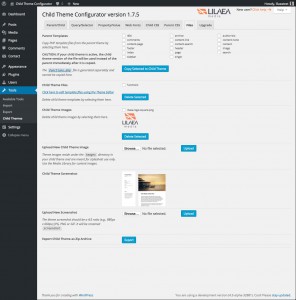
Parent Templates
Copy PHP template files from the parent theme by checking the boxes and clicking “Copy Selected to Child Theme” and the templates will be added to the child theme directory.
CAUTION: If your child theme is active, the child theme version of the file will be used instead of the parent immediately after it is copied.
The functions.php file is generated separately and cannot be copied here.
Child Theme Files
Templates copied from the parent are listed here. These can be edited using the WordPress Theme Editor in the Appearance Menu. If you have saved any backups they will appear here as well.
Remove child theme files by checking the boxes and clicking “Delete Selected”.
Child Theme Images
You can upload new images using the image upload form. These images reside under the images directory in your child theme and are meant for stylesheet use only. Use the media gallery for content images.
Remove child theme images by checking the boxes and clicking “Delete Selected”.
Child Theme Screenshot
You can upload a custom screenshot for the child theme here.
The theme screenshot should be a 4:3 ratio (eg., 880px x 660px) JPG, PNG or GIF. It will be renamed screenshot.
Export Child Theme as Zip Archive
You can download your child theme for use on another WordPress site by clicking “Export”.
Preview and Activate
IMPORTANT: Test your child theme before activating! Some WordPress themes (particularly commercial WordPress themes) do not correctly load parent template files or automatically load child theme stylesheets or php files. In the worst case they will break your website when you activate the child theme.
- Navigate to “Appearance > Themes” in the WordPress Admin. You will now see the new Child Theme as one of the installed Themes.
- Click “Live Preview” below the new Child Theme to see it in action.
- When you are ready to take the Child Theme live, click “Activate.”
MULTISITE USERS: Themes must be Network Enabled before you can use Live Preview with a specific Site. Go to “Themes” in the Network Admin to verify your child theme is Network Enabled.
Working With Multisite WordPress
Using Child Theme Configurator with Network Sites (Multisite WordPress) adds a level of complexity to the process because you can set up child themes from either the Network Admin or from individual sites.
WordPress Themes are shared globally by all network sites; however, each individual site has its own database tables, including customizer options, or “theme mods.” In addition, only themes that are “network enabled” are visible to the individual sites. When you create a new child theme, Child Theme Configurator automatically enables the child theme for all sites on the network so that it is visible under the Appearance > Themes admin page.
There is a difference between customizing themes (using Child Theme Configurator) and changing customizer options, or “theme mods.” Because all sites share the same network-enabled themes, any modifications you make to the child theme are applied to all the sites at the same time, whether or not you are using the Network Admin or an individual site admin.
However, when you use the customizer, widgets or menus admins, you are applying changes to a specific theme for a specific site. These changes are not applied to other sites, even if they are using the same theme.
If you check the box, “Copy Parent Theme Menus, Widgets and other Customizer Options” when creating or rebuilding a child theme, Child Theme Configurator copies only the customizer options, widgets and menus that exist in the parent theme for the current site being administered.
This can be even more confusing when using Child Theme Configurator from the Network Admin, because the “current site” is the primary site, or the site that existed before enabling Multisite WordPress.
In order for the parent theme’s options to be copied, the parent theme must be visible to the current site, and must already have options set that can be copied. Otherwise, the child theme will be created with the default options.
Never Create A Child Theme and Activate It At The Same Time
Creating and activating a child theme with a “single click” feature or plugin can break WordPress in spectacular fashion and even disable the WordPress Admin. Learn how to fix a broken theme caused by editing a php file or using a “single click” child theme plugin.
If you do not test a child theme before activating it, you expose your website to the following risks:
- If a WordPress theme is not written to be used as a child theme, uses invalid include paths or contains syntax errors, WordPress will throw a fatal error (crash).
- If the “stylesheet” directory is used for include paths, then PHP will throw a fatal error because the file probably does not exist.
- If the active theme crashes, users will not be able to view your site and you will be unable to get back into the admin.
For these reasons, among others, we strongly recommend that you test child themes (or any themes, for that matter) with Live Preview before activating them.
How to Create Child Themes After You Have Made Changes to an Existing Parent Theme
Things get a lot more complicated when you have already made significant changes to your Parent theme. You will need to move all your modifications into a child theme so that updating the parent does not wipe them out. Read through all of the steps below until you understand the process before starting.
- IMPORTANT: Make a backup of your customized parent theme. You’ll need this if things don’t work out and you need to revert.
- First, go to Tools > Child Themes. Make sure “CREATE a new Child Theme” is selected for “1 Select an action.”
- Next, select your current theme for “2 Select a Parent Theme.”
- Then (VERY IMPORTANT) click the link labeled “Click here to save a backup of the selected theme.”
- If the download does not work for some reason, you will have to backup the files using FTP, SSH or your Web Hosts file manager.
- Create a child theme from the Parent/Child Tab, but do not activate it yet. Make sure you check the “Copy Parent Theme Menus, Widgets and other Options” box to preserve any customizer settings you have made. Again, do not activate the Child Theme yet!
- Go the the Files tab and select any parent templates you have changed from the list of “Parent Templates” and click “Copy Selected to Child Theme.” WordPress will automatically use templates from the parent theme if they do not exist in the child theme, so you only need to copy files you have changed.
- Now the tricky part — moving your modified styles to the child theme. The best way to do this is to download your modified “style.css” file from the parent and run a comparison (DIFF) against the original parent “style.css” file. Copy the differences over to a separate file. You can use Notepad++, TextWrangler or any advanced text editor to find differences between two files.
If you do not have an advanced text editor, you will have to compare them manually. Open the modified stylesheet and manually copy/paste any selector blocks you have changed to a separate text file. A typical selector block looks like this:
.header-image {
    margin: 0;
}
If any of the selector blocks are within @media query blocks, make sure you add those as well. A typical @media query block looks like this:
@media screen and (max-width: 980px) { body { color: #333; } } - Once you have all of your changed selectors in a file, copy the entire thing into the “Raw CSS” textarea box at the bottom of the Query/Selector tab. Click the “Save” button to the left of the textarea box (not the one at the top).
- Custom Functions and Hooks If you have added any custom functions or hooks to the functions.php file, you will need to move these to the child theme functions file. Some theme functions are “pluggable,” meaning they are enclosed in a conditional statement:
if ( function_exists( 'some_function' ) ) { ...Since the child theme functions file is loaded first, WordPress will ignore the parent theme version because the function already exists in the child theme.
Otherwise, if the function name is completely unique, just move it to the child theme functions file and it will load normally.
Some themes use
includeorrequirestatements to load additional, “non-plugglable” functions and classes. These cannot be moved to the child theme. If you have customized any of this “non-pluggable” code, you will have to rewrite it to utilize WordPress action and filter hooks instead. See these links for more information: - Test the new child theme using the Live Preview. Go to Appearance > Themes and click “Live Preview” on the child themes icon. It should display all of your modifications correctly. If not, repeat step 3-5 until everything is working.
- Re-install the parent theme to a fresh, clean version and repeat step 6. If you notice anything wrong, you may need to investigate where you missed copying something. If necessary, revert to the backup parent theme and start over.
- Once everything looks good, go to Appearance > Themes and activate your new child theme. You can then make changes to the child theme without touching the parent.
WordPress Script Queue and Script Dependencies
WordPress has a system to make sure that scripts are loaded in the correct order and that plugins are all using the same version of common libraries. This allows plugins to utilize the vast array of software available without interfering with the execution of other plugins.
In order for this system to work correctly, all plugins have to play by the same rules or conflicts will occur that can cause the plugin, and even WordPress itself, to malfunction. In many cases these bugs are very hard to find, resulting in hours of lost time by WordPress plugin and theme authors trying to help their users.
If Child Theme Configurator detects a conflict that prevents it from executing, it will display an error message that identifies the scripts so you can deactivate the offending plugin and replace it with one that uses script dependencies correctly.
Why plugins should not use their own jQuery and jQuery UI libraries
The main reason is it will break WordPress, particularly the admin. It is not a question of performance.
In his post, Don’t Dequeue WordPress jQuery, Eric Mann (StackExchange moderator) explains many of the arguments for and against replacing the WordPress local versions. Pippin Williamson (EasyDigitalDownloads founder) provides reasons why using your own jQuery is irresponsible Sarah Gooding (WPMUDEV.org) calls it a “deadly sin.”
The bottom line is that WordPress guidelines advise against it, period.
Many WordPress core features and plugins depend on the local versions that ship with WordPress to function. These are registered as “script dependencies” when the features are loaded. When a page is delivered to the browser, WordPress puts all of these dependencies in order and loads the libraries at once (load-scripts.php), before any other scripts in the queue. Any plugin that has registered a dependency will then have access to the library and will execute as expected.
When a plugin enqueues its own version of these libraries, including “content delivery network” (CDN) versions, it destroys the version that was loaded by WordPress and any objects that were created using the core version. It is essentially saying “I am more important than any other plugin and I don’t care what breaks.”
Plugins can “deregister” scripts and then “register” their own versions, but they must first ensure the entire dependency chain is unaffected and also ensure that the version they are loading is compatible with the other libraries in the WordPress core. It is a much better practice to build the plugin around the most current WordPress version and only enqueue libraries that are not available in the WordPress core. Read more about how to enqueue scripts correctly.
Memory Considerations
Although it usually takes just a few seconds, parsing stylesheets so that they can be queried and modified using Child Theme Configurator is a memory-intensive process. Some web hosting packages do not allocate enough RAM to PHP for CTC to parse a large number of styles. We generally recommend at least 64MB for WordPress to run smoothly, however many budget hosts limit PHP to 32MB for shared accounts.
Child Theme Configurator estimates the number of styles it can process based on the available memory allocated and will stop parsing when it reaches this limit. If you are getting a notice that some stylesheets could not be parsed try deselecting them under “Parse Additional Stylesheets.”
Only select additional stylesheets that you intend to customize. Many WordPress themes include stylesheets for the admin that are never used for the public-facing site. In addition, Bootstrap stylesheets add a large number of styles (with very long selectors) that add unnecessary overhead to the configuration data.
Most of the time you can customize your WordPress theme by parsing one or two main stylesheets. Some experimentation may be required.
File Permissions
Child Theme Configurator uses the WordPress Filesystem API to allow changes to sites that require user permission to edit files. For the majority of users on typical Web Hosts, this feature will be completely transparent.
However, because most of the functionality occurs via AJAX (background) requests, systems that require write permissions will need a way to automatically write to these files.
The plugin will automatically detect your configuration and provide a number of options to resolve this requirement. Use the links provided to find out more about the options available.
- Temporarily make the stylesheet writable by clicking the “Make Writable” button that changes the file permissions. You should change this back when you are finished editing for security by clicking “Make read-only” under the “Files” tab.
- Add your FTP/SSH credentials to the WordPress config file.
- With Windows IIS, you can assign WordPress to an application pool that has write permissions (Windows IIS systems).
- Set the stylesheet write permissions on the server manually (not recommended).
- Run PHP under Apache with suEXEC (contact your web host).
Caveats
-
Some themes will not work as child themes.
IMPORTANT: Test your child theme before activating! Some WordPress themes (particularly commercial WordPress themes) do not correctly load parent template files or automatically load child theme stylesheets or php files. In the worst case they will break your website when you activate the child theme. Please see How Child Themes Work for more information.
-
Arbitrary comments are not supported.
Providing a high level of flexibility for previewing and modifying styles requires sophisticated parsing and data structures. Maintaining comments that bound to any particular element in the stylesheet is prohibitively expensive compared to the value it would add. Although we are working to include this as an option in the future, currently all comments are stripped from the child theme stylesheet code.
-
Legacy gradient syntax is not supported.
The Child Theme Configurator plugin does not support the MS filter gradient or legacy webkit gradient. These will continue to work if they are used in the parent theme, but will not be written to the child theme stylesheet. If there is a demand, we may add it in a future release, but most users should have upgraded by now.
-
Only two-color linear gradients.
The Child Theme Configurator plugin is powerful, but we have simplified the gradient interface. You can use any gradient you want as long as it is linear, has two colors and no intermediate stops.
-
No @font-face or other at-rules.
The Child Theme Configurator plugin only supports @media, @charset and @import. If you need other @rules, put them in a separate stylesheet and link them using the web fonts feature.
-
Not all browser-specific properties are automatically generated.
The Child Theme Configurator plugin works with the vast majority of vendor-specific properties, however we’ve left out some of the more obscure options. As with legacy gradients, they will work, but will not be automatically enhanced by the Configurator.
-
CSS properties are auto-discovered.
The Child Theme Configurator plugin loads the properties that exist in the Parent stylesheet. You can always add new properties using the “Raw CSS” text area.
Glossary
-
Parent Theme
The WordPress Theme you wish to edit. WordPress first loads the Child Theme, then loads the Parent Theme. If a style exists in the Child Theme, it overrides the Parent Theme.
-
Child Theme
New Theme based on Parent Theme. You can create any number of Child Themes from a single Parent Theme.
-
Class
A term used to organize objects. For example, a <div> might be assigned the “blue-text” class. The stylesheet might then assign the color blue to members of the “blue-text” class. Thus, the <div> would display text as blue in the browser.
-
Selector
One or more html elements, classes, ids or other terms used to identify groups of objects.
-
Property
One of many standardized terms used to tell the browser how to display objects matching a given selector. Examples are color, background-image and font-size.
-
At-rule
CSS browser instruction to extend default functionality. The Child Theme Configurator supports two At-rules:
-
@import
Instructs the browser to load additional CSS information from an external source.
-
@media (Media Query)
Identifies blocks of styles that are used only when certain browser characteristics are true. Examples are max-width, screen and print.
-
-
Override
When a selector exists in both the Child Theme and the Parent Theme, the Child Theme takes priority over the Parent theme. This is where the Child Theme Configurator stands out: it helps you create exact overrides of selectors from the Parent Theme, eliminating hours of trial and error.
-
Important Flag
CSS allows you to mark rules as “important,” meaning that the rule will take priority over any other selectors with the same property on the page, even higher priority rules. There may be times when this is necessary for a specific purpose, however most of the time the same result can be achieved by carefully naming selectors and adjusting their cascade order to modify inherited styles. Often using the important flag can create more problems than it solves by changing the behavior of higher priority rules.


